It's going to be a while before we have a house update with any interesting photos. The painters have been there 2 full weeks now and are still just sanding the trim. Then after they're done they lock down the house for a full week to let the paint fully cure before any other trades are allowed in. I'm sure it's good for the paint, but bad for our progress. In the meantime I wanted to share my latest project!
I really struggled with the design for our master bathroom. I seriously spent months playing with the colors, textures, features etc and just couldn't commit. My goal was a little rustic/country but still fresh and airy, and I wanted a fabulous light fixture centered over the clawfoot tub. Full disclosure, code prevents us from hanging it truly over the tub, but it will be centered left to right and will just hang 3' out away from the tub's edge. So I finally decided on direction for the overall look, which left me on the hunt for an amazing chandelier.
I made the mistake of asking for ideas in an online design forum I frequent and they had great suggestions... great, VERY EXPENSIVE suggestions. Check out this...
Marjorie Skouras chandelier which retails for $6,900. SWOOOOOOON! The colors weren't quite right anyway, even if the price tag didn't immediately rule it out. Sour grapes!

But because I've been doing SOOOO much online shopping for lighting, I knew I'd seen similar fixtures with natural wood beads, as opposed to the glass, marbles, and precious gems. So in my typical fashion I decided to DIY, though not from scratch. There are a lot of tutorials out there for building a chandelier from scratch, but electrical "stuff" is not a skill I have and not one I have time or interest in acquiring. Ever since I got a pretty good zap from a live wire in my apartment in college, all things electrical have kind of freaked me out. So, I figured I'd buy a fixture that could be adapted, and I'd end up with a custom chandelier in the perfect shade of mint green, my latest obsession.
I thought I'd get this one from World Market and just paint the beads. Every time I'd go to order it, I'd hold off waiting for a sitewide sale PLUS free shipping. They sent me a 20% off customer appreciation coupon, that I was eager to use, but then when they tack on all the oversized item shipping fees, shipping comes to like $60 and then $25 tax and my 20% doesn't make a dent in all that. But I'm so glad in the end that they deterred me because...

... then I found this picture. While I LOVE the fixture (and everything in the room for that matter) I'm so glad I found this because I don't like the way the light hits the room creating all those shadows. This is a master bathroom afterall. Imagine putting on makeup in that light! So a very special thanks to World Market for their outlandish shipping charges. They saved me from a huge lighting mistake!

So then the mission became a wooden bead chandelier with the light fixtures on the OUTSIDE of the beads in the perfect shape and size. That was a no go. The lighting industry was just not cooperating.
Undeterred, I bought this fixture from Ballard Designs. It was $250 and I used a 15% coupon that came in a previous order from ballard. Actually, my coupon had just expired, so I just called and they honored it for me and it arrived 3 days later. Please note, I inspected photos of this fixture from several angles to determine that the top ring is open and not solid. That gives me a place to tie on bead strands! If it were solid, I would have had to engineer hooks or something for the beads to hang on.

It arrived around 7pm on a weeknight, and by 9pm I had it painted. :) Dark bronze isn't really my jam. I wanted my light to be a little more rustic and earthy than the inspiration chandy. Also I wanted to tie in the galvanized vanity sconces, so I faux finished this to look galvanized. Cool, right? Can you see how I have this light rigged up? I've got 2 boards across the ends of 2 saw horses so the ring of the chandy has a place to rest. The bottom is bowl-shaped so getting the whole thing painted would have been a challenge if not willing to rig up ugly stuff in one's foyer! :)


Then I geeked out with all my circumfrence calculations to figure out the number of beads I'd need to recreate that solid bead look. Ready for this? 5,500 beads. I got a good deal on them, but I wish I wasn't so hasty in that purchase because I ended up getting handmade Indian beads that are a dark wood and sealed. I love how the shapes are imperfect - it's more organic. But if they were completely unfinished it would have been a lot easier to paint them. But they came in strands of 100 which was nice.
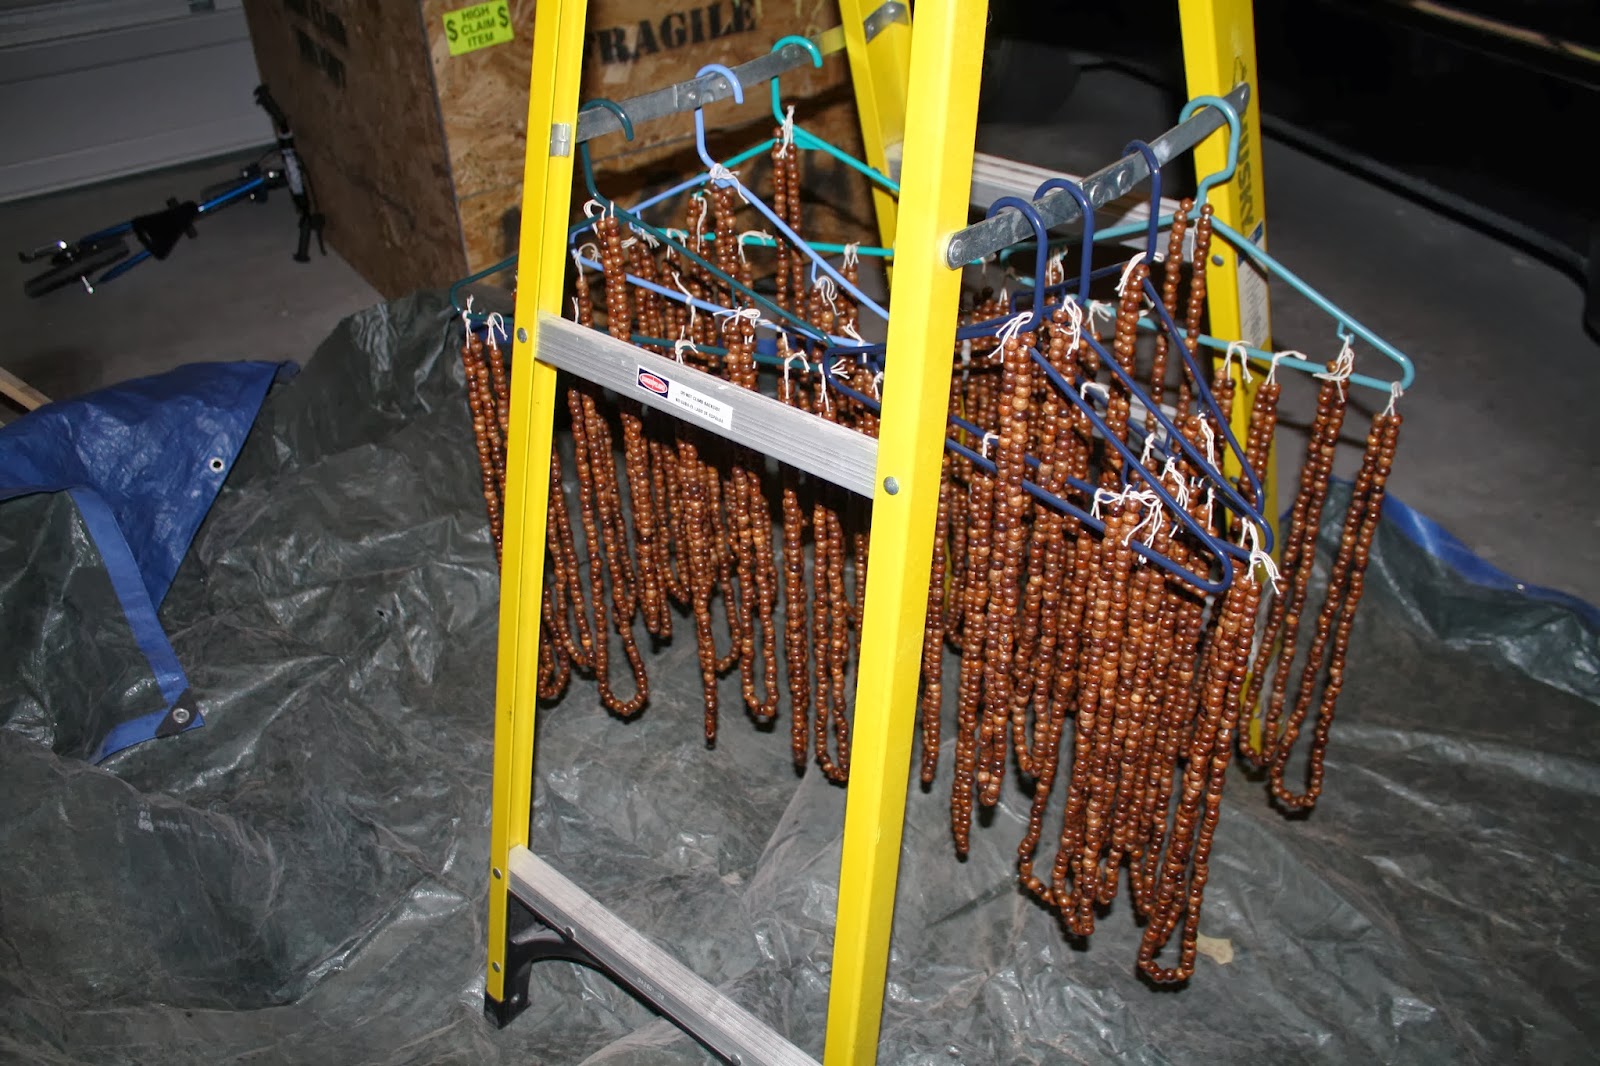
Here's the process of getting ready to spray paint them. I thought I was pretty clever to hang them on clothes hangers to spray them all at once.
I thought this color, Catalina Mist by Krylon would be the perfect color. I loved the cap, and I saw lots of projects using this color online. However, I was super disappointed with it in real life. :(

I thought I'd just hang them and spray them. And when 1 full can only got me about halfway through one coat, I was discouraged. And when I saw that the beads pretty much rejected the first coat and the color came out a very muted blue/turquoise, nothing like the mint I was expecting, I decided I needed a new approach. When all else fails I turn to homemade chalk paint. :)
So I picked my new color, again from seeing other finished projects online, and this is called "Sweet Pea" by Olympic. However, I had it mixed at Sherwin Williams. Did you know they give you a full quart size container for their $5 sample? It's an insane sample size, and the guys at Sherwin Williams are so much more helpful than HD and Lowes. Here's the sweet pea swatch:

Given the shiny finish on the beads, I mixed this up extra chalky. Pic below shows the spray paint finish on the left and one coat of chalk paint on the right. Much better finish and much better color! Just 5,100 left to go!

Ok, so here they are all painted. This process took WAAAAAAAAAAAAAAAY longer than I expected. It took me about 30 minutes per coat hanger full, per coat, and I gave them 2 coats of the chalk paint. I was much happier with the color and coverage at this point though.


So then I started hanging the strands on the bottom. It was a major challenge because there's not much to attach to besides the thick ring at the top, and getting a nice tight knot on such a wide band wasn't easy. In fact, I finished stringing strands all the way around the bottom, and the next night I started snipping the excess string, and as soon as I did that, the weight of the beads undid the knots and all my beads started dropping like flies. I was devastated and just removed the strands that hadn't succumbed yet.
It was at this point that Brent jumped in so I didn't feel so alone in this wretched project. He could see my meltdown in progress! Once he started counting out beads and cutting strings to size we got on a roll. I had a new method of attaching and it started going much more smoothly for the first half of the bottom. At the halfway point I started running out of good places to tie the string on the bottom center. I also applied a blob of E6000 glue to each knot I tied as extra insurance. :)
Here's what it looks like in progress:

I knew the top was going to be a huge challenge because I wanted it to look like a solid sheet of beads, and the beads are 1/2" diameter. The top ring I was attaching to is roughly half the diameter of the bottom ring I was attaching to. So if I used enough strands to cover fully at the bottom I was going to be super crowded at the top, and if I only filled the top the bottom would have big gaps. After I started hanging the first strand I had an epiphany. I should have thought of this from my tiara and jewelry making days.
Basically, I just had to start stringing from the bottom ring, go all the way up to the top, wrap the string around the top ring, and start threading the string through that same strand of beads to about halfway down. At the halfway point, then I start adding more beads to create another strand to fill up more space as the diameter of the circle got bigger. This is what I mean:

See how it looks like one strand turns into two strands? It turns out this filled the space perfectly. You can also see that the paint chipped pretty badly from separating the beads where they were stuck together. At first I was discouraged by this, but now I'm thrilled as it looks so much more natural. Au natural distressing.
Once we had a system, Brent even started stringing beads and then we really flew through it. It was kind of nice - our late night therapy. I suspect I might catch him stringing beads in his closet some day. :)
Some more in process shots: (you can see our other little helper napping on the couch)


The final step was wrapping the two rings where all the strings were attached with jute rope. I had to disguise the ties, and I love the natural touch of the jute.
And here's the finished product. The photo sadly does it NO justice, but I needed to get this big chandelier out of the living room and away from sticky fingers so I couldn't hold off for a better picture. I hope you'll stay tuned for photos of this hanging in our master bathroom! It's a lot bigger than it's photographing, and very heavy with all the beads now!


So overall, I'm so happy with the outcome. That said, if I knew then what I know now, I'm not sure I would have taken this project on with everything else I have going on. They'll need all our lighting at the house soon and I felt a lot of pressure to power through this one. It DEFINITELY would have been a million times more enjoyable to buy a fixture that already came with beads that I could have just painted. That alone is a big project but it would have been more manageable. Now that it's done I'm happy to have this pretty light, but I can't encourage anyone reading this to run out and do this. If you've got all the time in the world, by all means, string away. For the rest of you, just go find a different style fixture. :)
I really struggled with the design for our master bathroom. I seriously spent months playing with the colors, textures, features etc and just couldn't commit. My goal was a little rustic/country but still fresh and airy, and I wanted a fabulous light fixture centered over the clawfoot tub. Full disclosure, code prevents us from hanging it truly over the tub, but it will be centered left to right and will just hang 3' out away from the tub's edge. So I finally decided on direction for the overall look, which left me on the hunt for an amazing chandelier.
I made the mistake of asking for ideas in an online design forum I frequent and they had great suggestions... great, VERY EXPENSIVE suggestions. Check out this...
Marjorie Skouras chandelier which retails for $6,900. SWOOOOOOON! The colors weren't quite right anyway, even if the price tag didn't immediately rule it out. Sour grapes!

But because I've been doing SOOOO much online shopping for lighting, I knew I'd seen similar fixtures with natural wood beads, as opposed to the glass, marbles, and precious gems. So in my typical fashion I decided to DIY, though not from scratch. There are a lot of tutorials out there for building a chandelier from scratch, but electrical "stuff" is not a skill I have and not one I have time or interest in acquiring. Ever since I got a pretty good zap from a live wire in my apartment in college, all things electrical have kind of freaked me out. So, I figured I'd buy a fixture that could be adapted, and I'd end up with a custom chandelier in the perfect shade of mint green, my latest obsession.
I thought I'd get this one from World Market and just paint the beads. Every time I'd go to order it, I'd hold off waiting for a sitewide sale PLUS free shipping. They sent me a 20% off customer appreciation coupon, that I was eager to use, but then when they tack on all the oversized item shipping fees, shipping comes to like $60 and then $25 tax and my 20% doesn't make a dent in all that. But I'm so glad in the end that they deterred me because...

... then I found this picture. While I LOVE the fixture (and everything in the room for that matter) I'm so glad I found this because I don't like the way the light hits the room creating all those shadows. This is a master bathroom afterall. Imagine putting on makeup in that light! So a very special thanks to World Market for their outlandish shipping charges. They saved me from a huge lighting mistake!

So then the mission became a wooden bead chandelier with the light fixtures on the OUTSIDE of the beads in the perfect shape and size. That was a no go. The lighting industry was just not cooperating.
Undeterred, I bought this fixture from Ballard Designs. It was $250 and I used a 15% coupon that came in a previous order from ballard. Actually, my coupon had just expired, so I just called and they honored it for me and it arrived 3 days later. Please note, I inspected photos of this fixture from several angles to determine that the top ring is open and not solid. That gives me a place to tie on bead strands! If it were solid, I would have had to engineer hooks or something for the beads to hang on.
It arrived around 7pm on a weeknight, and by 9pm I had it painted. :) Dark bronze isn't really my jam. I wanted my light to be a little more rustic and earthy than the inspiration chandy. Also I wanted to tie in the galvanized vanity sconces, so I faux finished this to look galvanized. Cool, right? Can you see how I have this light rigged up? I've got 2 boards across the ends of 2 saw horses so the ring of the chandy has a place to rest. The bottom is bowl-shaped so getting the whole thing painted would have been a challenge if not willing to rig up ugly stuff in one's foyer! :)


Then I geeked out with all my circumfrence calculations to figure out the number of beads I'd need to recreate that solid bead look. Ready for this? 5,500 beads. I got a good deal on them, but I wish I wasn't so hasty in that purchase because I ended up getting handmade Indian beads that are a dark wood and sealed. I love how the shapes are imperfect - it's more organic. But if they were completely unfinished it would have been a lot easier to paint them. But they came in strands of 100 which was nice.
Here's the process of getting ready to spray paint them. I thought I was pretty clever to hang them on clothes hangers to spray them all at once.

I thought this color, Catalina Mist by Krylon would be the perfect color. I loved the cap, and I saw lots of projects using this color online. However, I was super disappointed with it in real life. :(

I thought I'd just hang them and spray them. And when 1 full can only got me about halfway through one coat, I was discouraged. And when I saw that the beads pretty much rejected the first coat and the color came out a very muted blue/turquoise, nothing like the mint I was expecting, I decided I needed a new approach. When all else fails I turn to homemade chalk paint. :)
 |
| This is one full can of spray paint. In the photo, it appears to be a close match to the spray can cap, but in real life, it's darker and bluer. |
 |
| Not good coverage with the spray paint!! |
So I picked my new color, again from seeing other finished projects online, and this is called "Sweet Pea" by Olympic. However, I had it mixed at Sherwin Williams. Did you know they give you a full quart size container for their $5 sample? It's an insane sample size, and the guys at Sherwin Williams are so much more helpful than HD and Lowes. Here's the sweet pea swatch:

Given the shiny finish on the beads, I mixed this up extra chalky. Pic below shows the spray paint finish on the left and one coat of chalk paint on the right. Much better finish and much better color! Just 5,100 left to go!

Ok, so here they are all painted. This process took WAAAAAAAAAAAAAAAY longer than I expected. It took me about 30 minutes per coat hanger full, per coat, and I gave them 2 coats of the chalk paint. I was much happier with the color and coverage at this point though.


So then I started hanging the strands on the bottom. It was a major challenge because there's not much to attach to besides the thick ring at the top, and getting a nice tight knot on such a wide band wasn't easy. In fact, I finished stringing strands all the way around the bottom, and the next night I started snipping the excess string, and as soon as I did that, the weight of the beads undid the knots and all my beads started dropping like flies. I was devastated and just removed the strands that hadn't succumbed yet.
It was at this point that Brent jumped in so I didn't feel so alone in this wretched project. He could see my meltdown in progress! Once he started counting out beads and cutting strings to size we got on a roll. I had a new method of attaching and it started going much more smoothly for the first half of the bottom. At the halfway point I started running out of good places to tie the string on the bottom center. I also applied a blob of E6000 glue to each knot I tied as extra insurance. :)
Here's what it looks like in progress:

I knew the top was going to be a huge challenge because I wanted it to look like a solid sheet of beads, and the beads are 1/2" diameter. The top ring I was attaching to is roughly half the diameter of the bottom ring I was attaching to. So if I used enough strands to cover fully at the bottom I was going to be super crowded at the top, and if I only filled the top the bottom would have big gaps. After I started hanging the first strand I had an epiphany. I should have thought of this from my tiara and jewelry making days.
Basically, I just had to start stringing from the bottom ring, go all the way up to the top, wrap the string around the top ring, and start threading the string through that same strand of beads to about halfway down. At the halfway point, then I start adding more beads to create another strand to fill up more space as the diameter of the circle got bigger. This is what I mean:

See how it looks like one strand turns into two strands? It turns out this filled the space perfectly. You can also see that the paint chipped pretty badly from separating the beads where they were stuck together. At first I was discouraged by this, but now I'm thrilled as it looks so much more natural. Au natural distressing.
Once we had a system, Brent even started stringing beads and then we really flew through it. It was kind of nice - our late night therapy. I suspect I might catch him stringing beads in his closet some day. :)
Some more in process shots: (you can see our other little helper napping on the couch)


The final step was wrapping the two rings where all the strings were attached with jute rope. I had to disguise the ties, and I love the natural touch of the jute.
And here's the finished product. The photo sadly does it NO justice, but I needed to get this big chandelier out of the living room and away from sticky fingers so I couldn't hold off for a better picture. I hope you'll stay tuned for photos of this hanging in our master bathroom! It's a lot bigger than it's photographing, and very heavy with all the beads now!


So overall, I'm so happy with the outcome. That said, if I knew then what I know now, I'm not sure I would have taken this project on with everything else I have going on. They'll need all our lighting at the house soon and I felt a lot of pressure to power through this one. It DEFINITELY would have been a million times more enjoyable to buy a fixture that already came with beads that I could have just painted. That alone is a big project but it would have been more manageable. Now that it's done I'm happy to have this pretty light, but I can't encourage anyone reading this to run out and do this. If you've got all the time in the world, by all means, string away. For the rest of you, just go find a different style fixture. :)
Can't wait to see it hanging!!
ReplyDeleteI absolutely love the colour, it's gorgeous!
ReplyDelete